 5 Simple Actions You Can Take Immediately To Keep Your New Paint Looking Fresh By: Suzie Paints A
fresh coat of paint often brings feelings of
peace, rejuvenation, and positivity about the
future so of course we want to keep those
feelings for as long as possible. A way to do
that is to protect and maintain your fresh paint
over time. Getting more mileage out of your new
paint takes a combination of protecting /
maintaining the existing paint in your home and
protecting the leftover paint so it is usable in
the future for touch ups or minor repaints. Some
ways to care for your paint are pretty obvious
such as ‘don’t hit the wall with your suitcase’
and ‘clean off the muddy paw prints your pup
left’. However, there are other ways that are
not so obvious but do help extend the life of
your paint. Today I’ll give you 5 simple actions
anyone can do immediately after your paint
project is completed to help keep your new paint
looking fresh for as long as possible.
You may be wondering what this has to do with keeping your paint looking fresh over time. Actually, it has quite a lot to do with it. Labeling your touch up paints immediately after your paint project is finished is vital because it suppresses the most common touch up mistake I see: touching up with the wrong paint. An obvious label with the important information of date and specific location clearly stated nearly erases this common touch up mistake. My local clients can skip this step because I do all the labeling for them, but for everyone else it is supremely important you put your own label on the touch up paints! If you’re doing DIY painting then it is up to you to do the good labeling. If you hire outside painters it is up to you to add labels if they didn’t and to make sure the labels they put on are correct for your home. A good label on your paint can has 2 important details: Specific Location & Date. Having the correct date on your paint cans is important not only so you know how long ago that area was painted but also so you can make an educated guess as to how well that area might touch up. The older the paint the less likely the touch up will completely disappear like you wish. The
other important part of a good label is the specific
location in your home where that paint has been
applied. The location part of the label is a common
stumbling block if it uses general details instead
of clarity details. Let me explain: you can get away
with labeling a can of paint ‘kitchen’ because often
times we only have 1 kitchen in our home. However,
if you label a can of paint ‘bedroom’ and you have 3
bedrooms that label isn’t very helpful. The better
way to state the location is with specific details
that only apply to THAT area but aren’t
color-related: Suzie’s bedroom (not ‘pink bedroom’),
front bedroom, downstairs bedroom, etc. If you used
that color of paint in more than one room then make
sure you put all the rooms on the same label: spare
bedroom, sitting room, & upstairs hallway. If
you have that level of specific details on your cans
then there is no reasonable explanation why any
future touch up is done with the wrong paint. 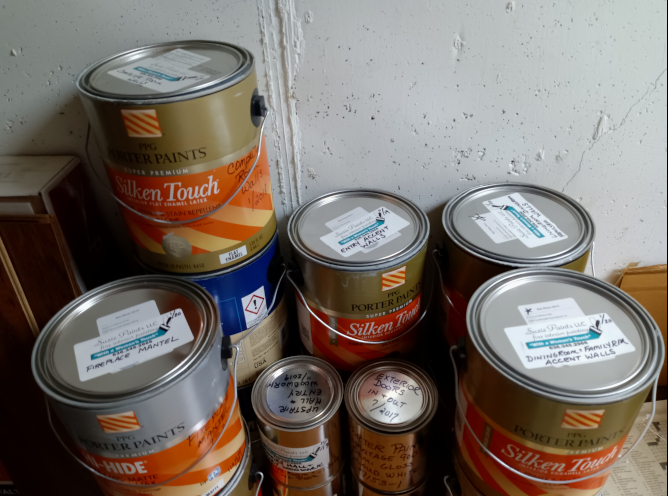 It's hard to mistake where these paints go with all those labels!
Having usable touch up paint is an integral part of your ability to keep your new paint looking fresh for longer. If the paint gets frozen, it gets chunky like cottage cheese and becomes unusable. If you can’t use it for touch ups then buying new paint and repainting is required. Having to repaint instead of touching up directly defeats the purpose of maintaining your new paint so you can go longer between repaints. The
best way to protect your paint from freezing is to
keep it someplace that is climate-controlled such as
your basement. So many people want to store the
paint in the garage but they don’t realize that is a
bad idea! Besides the fact that large swings in
temperature can cause your paint cans to swell when
it’s hot and potentially burst or contract when it’s
cold and crunch the sides of the cans, I’ve also had
clients who had to clean up huge paint messes in
their garage before they went to work because
animals got inside and knocked the paints off of the
top shelf. If you plan to keep your touch up paint
in a storage unit or other storage space not in your
home you need to be aware of how climate-controlled
that area is, too. Storing your paint in the small
shed of your Condo’s parking structure is basically
storing it in your garage. Do us both a favor
and please don’t store the
paint in your garage!
Modern good quality paint is made to be maintained differently from paints of the past so we have to adjust how we care for our fresh paint if we want it to look nice for as long as possible. Gone are the days when only gloss paints were washable and everything could be touched up perfectly for decades. Nowadays there are 2 main situations where cleaning is the better maintenance decision than touch ups (even when you touch up you still have to clean the area first). Situation 1 I call ‘stuff on the wall’ and it’s the easy stuff like toothpaste, a coffee/soda spill, or dirt smudge that can be wiped off with a damp cloth as soon as you notice it. Situation 2 is the sneaky buildup of hand/pet oils over time in areas of constant use such as around light switches, door edges, or where your pet likes to lay against the wall. This situation is trickier to handle because the discoloration is so subtle for so long until suddenly it isn’t. For
Situation 2, I teach my clients that the oils can
cause the paint to bubble up over time and those
areas need to be cleaned with a soft white cloth and
a warm water/ Dawn dish soap solution as soon as
they notice a discoloration. I specifically advise
against using a Magic Eraser or antibacterial wipe
on the paint because those products are for hard surfaces
and they will damage your paint. Both products ruin
the sheen everywhere you scrubbed and the wipes have
turned some paints sticky to where they start
collecting dust. If the hand/pet oil areas won’t
come clean with the soapy water don’t go directly to
a touch up because there’s still oil there and the
area isn’t clean enough for paint to stick well.
You’re going to need a paint preparer to get the
oils off and a repaint of that whole
corner-to-corner section or door. 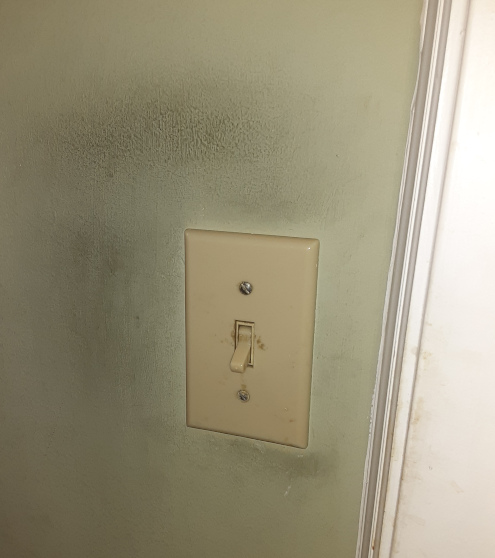 This area should have been cleaned many times long before this much hand-oil could build up.
The point of a touch up is that it matches the existing paint so perfectly that it disappears and nobody would ever know where you touched up. That is great in theory and would always happen in a perfect world. Last time I checked, we don’t live in a perfect world so we have to use good techniques to increase our chances of getting a perfect match that disappears as we would like. A basic touch up principle is newer paint touches up better than older paint so you’re better off doing touch ups sooner rather than later. The year after you paint your chances for good touch ups start to drop quickly. To
eliminate touch ups that clearly won’t work, I teach
people to make a sample card of the touch up paint
before they go touching up on their existing paint.
This is an easy touch up technique that lets you
double check that 1) the color and sheen are correct
and 2) the touch up paint will actually match the
existing paint everywhere you want to touch up. You
especially need to check first with your sample card
in areas that get a lot of light or get
high-traffic. These are the areas where touch ups
tend to fail first because the touch up paint hasn’t
gotten the wear the existing paint has taken over
time. To make this part easier for you, I’ve created
a handy little roadmap to help you determine if you
should touch up or repaint the area that isn’t
looking as fresh as you want. Just sign up for my
email list by CLICKING
HERE and your Touch Up vs Repaint Roadmap will
be sent to you. 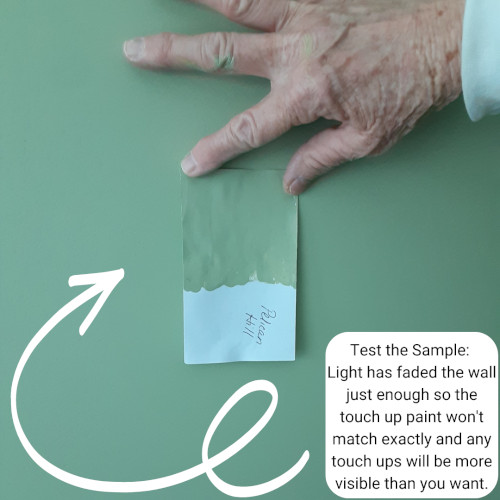 Sometimes people don’t mind so much if the touch up paint is a tiny bit imperfect because it’s better than the obvious blemish that’s very noticeable to them. I understand this position (even if I don’t care for it) as long as people choose it knowingly rather than being stuck with bad touch ups that were intended to blend. No matter the color-match position you take at any given time, touch ups should always be done as tiny as possible to minimize their impact on your existing paint. Most touch ups require just a small artist or craft brush rather than a big roller or 4 inch brush.
This is the part nobody wants to hear when we’re talking about protecting your new paint and getting more mileage out of it. I know full well that we want to be able to do what we want in our own homes because it’s practically the only space we fully control. But, please note that certain habits or preferences negatively impact your fresh paint, make touch ups less likely to disappear, and can shorten the overall time it looks new and fresh after your latest repaint. We both know that nobody is actually going to follow this list completely (my own family doesn’t even do it) so the next best option is to try and minimize the impact these actions have on your new paint. In no particular order, I give you: The List Nobody Likes:
The point of this list is not to keep you from doing what you want but instead to educate you. I want you to understand the impact your actions can have on your fresh paint and to knowingly choose how far you want to go to protect and maintain what you just spent valuable time, money, and energy on. Now that you are aware of these 5 simple actions: label your touch up paints with clarity details, protect your touch up paints from freezing, clean gently before trusting touch ups, use good touch up techniques, and minimize paint-damaging habits, you can see they make quite a lot of sense when you pause to think about them. This little bit of extra knowledge may not be breaking news but you can begin using it to extend the life of your next paint project. You can also use your new knowledge to minimize further wear and tear on your existing paint and help you make smart painting-related decisions about your home now and in the future. Yours In Color, Suzie |